
Free U.S. Shipping on Orders over $50 - DAILY WORLDWIDE SHIPPING
FOR ALL SUBSCRIBERS

Last Updated: November 1, 2026
Quick Summary
To identify original game hardware, check the shell texture and mold lines, verify label print quality, open the cart to inspect screws and board markings, and run a serial number lookup against community databases. Model code first, serial second, date third, if all three agree, you're looking at original hardware.
Spotting original game hardware starts with the plastic. Original shells have a specific texture, weight, and mold line pattern that aftermarket plastics rarely match.
Here's what we look for at Retro Gaming of Denver when a trade-in walks through the door:
Watch out: a "mint" shell on a console that should show age is a red flag. Sun-faded originals are honest.
Once you've checked the shell, look at storage. Our guide on storing vintage game consoles without ruining them covers the basics.
Labels are where most fakes fall apart. Original game hardware labels were printed on specific stock, with specific fonts, at specific factories. Reproductions almost always miss a detail.
Compare any suspect cartridge against a known authentic example. Here's the checklist:
If the label looks right, keep the cart clean so it stays that way. Our guide on cleaning vintage game cartridges walks through safe methods that won't lift the print.
Open the cart.
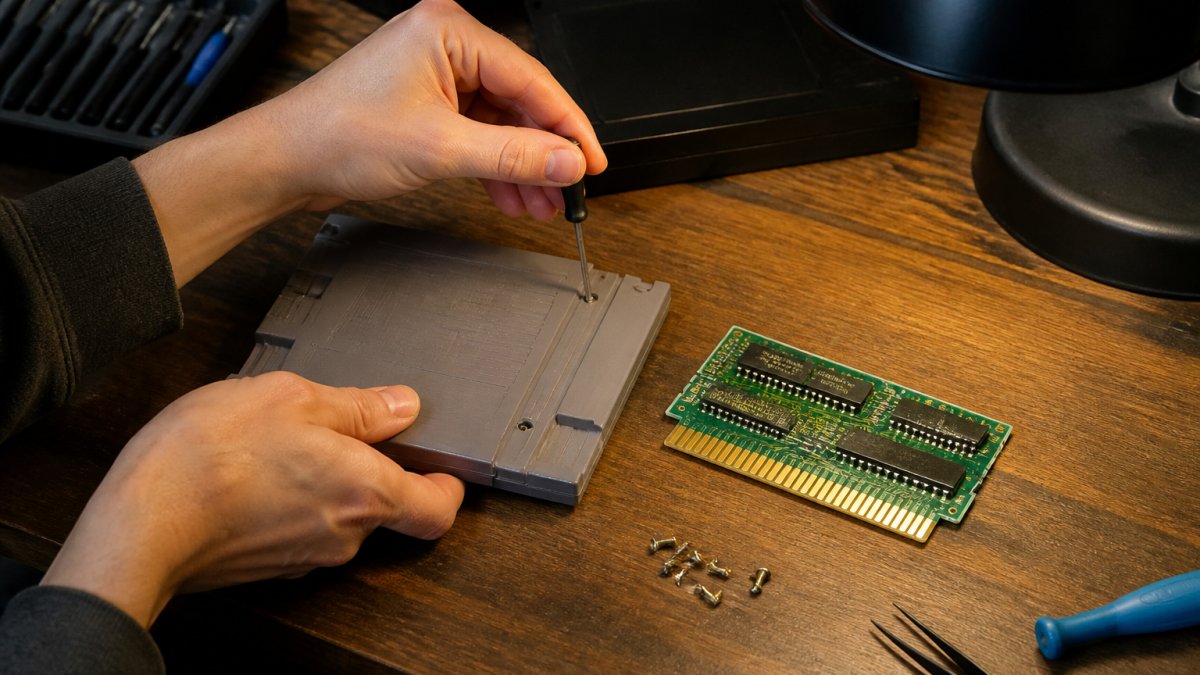
Screw type is your first clue. Nintendo used specific security bits on many carts.
Board markings come next. Real boards carry manufacturer names, date codes, and board revision numbers.
Chip labels and solder tell the rest.
A common mistake is trusting the shell alone. Plenty of fakes use real shells with fake boards inside. Always check both.
Serial numbers are the paper trail of original game hardware. A proper retro console serial number lookup confirms the model, region, revision, and often the production window.
Here's the workflow we run at the counter:
The Game Boy Hardware Database is a solid example of how serial and board data get catalogued for handhelds. Similar archives exist for most major consoles, Nintendo, Sega, Sony, and Atari all have dedicated community databases worth bookmarking.
Model codes are where the real information lives. A few patterns worth knowing:
A seller who lists "GameCube" without the model number is leaving out the detail that decides whether you get 480p output. Same story with a "Game Boy Advance" that turns out to be the non-backlit AGB-001 when you wanted the SP.
Region codes trip people up more than any other detail. A Japanese console may not play your US carts without a mod, and a PAL unit may not output correctly on a North American TV without a converter. Check the region before you commit, the label, the box, and the boot screen should all agree. If they don't, walk away.
The manufacturing date is the quiet tell. Scrutinizing these subtle inconsistencies remains the most reliable method for identifying fake collectibles across the entire spectrum of vintage gaming and hobbyist markets.
Board revisions matter too. Manufacturers quietly revised boards mid-run to cut costs or fix faults. Some revisions are more desirable, better audio, better video output, more reliable lasers. A quick lookup before you buy can save you from a revision with a known failure point.
Indigo GameCube System [DOL-001] - GameCube (SUPER RARE) →
Model codes are the fastest way to tell exactly which hardware revision you're looking at.
| Model code | Hardware | Key detail |
|---|---|---|
| DMG-01 | Original Game Boy | Nintendo handheld |
| CGB-001 | Game Boy Color | Nintendo handheld |
| AGB-001 | Original GBA | Non-backlit |
| AGS-001 vs AGS-101 | Game Boy Advance SP | Frontlit vs backlit |
| DOL-001 | GameCube | Has digital AV port |
| DOL-101 | GameCube revision | Dropped digital AV port |
| NUS-001 | Nintendo 64 | Original model |
| SCPH-1001 | US PlayStation | Full rear port set |
Testing is non-negotiable. A clean shell and correct serial mean nothing if the console won't boot, or boots today and dies next week. Here's the systematic pass we run, plus safe-inspection habits that keep you from damaging a collectible.
Do the visual and mechanical checks first. Powering up a unit with a damaged power supply or a bulging capacitor can turn a fixable console into a parts unit.
Once the unit passes the visual check, run this sequence with a known-good game, your cart, not the seller's:
Opening a console is the fastest way to verify originality, but it's also the fastest way to damage a collectible if you're careless. A few rules:
For controllers specifically, our guide on testing used console controllers goes deeper on button response, stick drift, and cable condition.
Accessories are half the story, and they're where bundles fall apart. Original game hardware bundles came with specific controllers, cables, and inserts. Mismatched accessories are a clue the bundle isn't complete or original.
Refurbished and modified consoles are not fakes, but they are not original either. Knowing the difference protects your wallet.
Refurbished means the unit was cleaned, tested, and often repaired.
Modified means someone changed the hardware. Region switches, HDMI mods, and battery replacements all count. Some mods add real value.
Look for these tells:
If you want a clear side-by-side on what each path means for you, our refurbished vs original retro consoles guide lays it out.
A console with a third-party controller isn't a dealbreaker. Just price it accordingly.
Buying in person lets you run every check above. Buying online means trusting the seller's description and photos.
At Retro Gaming of Denver, every console we sell is tested and backed by a warranty, so you're not gambling on a listing photo. Our refurbished units go through a full inspection before they ship, and if a unit needs work down the line, our Video Game Console Repair Services are there for everything from dirty power switches to failing disc drives. Cartridges with a dead save battery are an easy fix too, our Game Cartridge Battery Replacement Service gets your saves holding again.
Here's what we offer:
Want a real example? Our Indigo GameCube System [DOL-001] comes complete in box with the OEM power supply, AV adapter, and original controller. The DOL-001 model is the one collectors want for 480p output, and it ships with our 1-Year Warranty.

Not sure what's covered? Our guide on retro console warranty protection plans explains the details.
Start with the plastic shell, then work inward. Original game hardware usually shows even wear, correct screw types, and a serial or model label that matches the region. Cross-check the model number against archival references and the Game Boy Hardware Database for handhelds. Open the case only if you are comfortable doing so, and look for board markings and manufacturing codes that match the model. If the seller's photos do not show the label, screws, and rear ports clearly, ask for more before buying.
They do, and both are useful clues. Original cartridges typically use a specific screw type for their era, and the circuit board carries printed markings, board revisions, and chip layouts that reproduction shells often get wrong. Compare any cartridge against a known authentic example of the same game and region. Watch for aftermarket shells with slightly different plastic texture, missing imprints, or a board that does not sit flush. A price that looks too good for a rare title is its own warning sign.
Ask for clear, well-lit shots of the label and serial number, the rear ports, the screw heads, and the cartridge pins or disc tray. Request a photo of the console running on a screen so you can see video output, and one of the controller ports with a controller plugged in. For cartridges, ask for the board edge and the back label. A seller who hesitates on these requests, or sends only glamour shots of the front, is telling you something.
Often it will boot and play, which is exactly why reproductions cause trouble for buyers. The problem is not always function but value, save reliability, and battery-backed games where a cheap replacement battery may not last. If you only want to play, a reproduction can be fine as long as you know what you are buying and pay accordingly. If you are collecting, verify the board, screws, and label against a known authentic example before you hand over money.
The retro market is full of listings that look right and aren't. Knowing how to identify original game hardware gives you the edge, and buying from a seller who tests and stands behind their gear removes the guesswork. Get started with Retro Gaming of Denver and play the classics the way they were meant to be played, with a warranty behind every console.


{"one"=>"Wählen Sie 2 oder 3 Artikel zum Vergleichen aus", "other"=>"{{ count }} von 3 Elementen ausgewählt"}
Wählen Sie das erste zu vergleichende Element aus
Wählen Sie das zweite zu vergleichende Element aus
Wählen Sie das dritte Element zum Vergleichen aus

Einen Kommentar hinterlassen