
Free U.S. Shipping on Orders over $50 - DAILY WORLDWIDE SHIPPING
FOR ALL SUBSCRIBERS

Last Updated: October 25, 2026
Here's the hard truth about how to store vintage game consoles: if you store vintage game consoles in an attic that kept your old NES "safe" for twenty years, it may have already killed it.
The parts that fail first are usually the same ones. iFixit's console teardown guides show that aging capacitors, cartridge connectors, and save batteries sit at the heart of most failures.
Common killers include:
We put together a guide on common issues with used NES consoles if you want to see what these problems look like up close.
Cleaning is the most skipped step, and it's the one that matters most. Dirt and skin oils turn into permanent stains over years in a box. Dust becomes a moisture trap.
Before you store anything, unplug it and let it cool. Then work through this list:
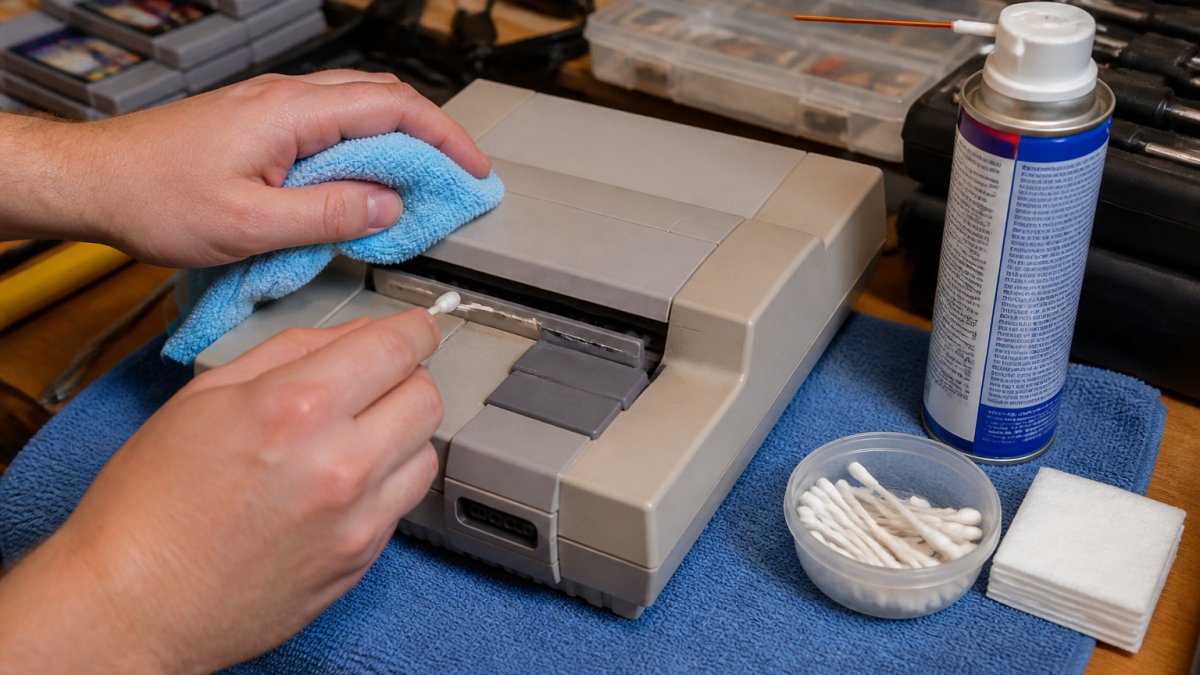
Use isopropyl alcohol on contacts. Use microfiber cloths on plastic. That's the short version.
Never use these:
If your cartridges need more attention, our guide on how to clean vintage game cartridges walks through the full process, including stubborn pin corrosion.
The best storage spot is a dry, dark, indoor space with steady temperature.
A garage that freezes at night and warms by afternoon is one of the fastest ways to crack old plastic and stress solder joints.
Look for a spot that stays:
If you only have a garage or basement, keep consoles off the floor and away from concrete walls. Concrete wicks moisture straight into cardboard and fabric.
"Keep it dry" is not a plan. Humidity rusts cartridge pins, corrodes solder joints, and feeds the mold that eats paper labels and manual inserts. If you want your collection to survive a decade in the closet, you need to know what you're fighting.
A common target among collectors and preservation folks is 40-50% relative humidity, with temperature holding steady in the 60-70°F band. A cheap digital hygrometer (the kind sold for reptile tanks and humidors) dropped inside your bin or closet tells you everything, if it creeps past 60%, your desiccant is spent or your seal is failing.
Here's the part most guides get wrong: a watertight tote is only your friend if the console going in is bone dry. Seal in even a little residual moisture, from a damp cloth, a humid room, or condensation from a cold garage, and you've built a terrarium that cycles moisture against the board every time the temperature shifts.
So the order matters:
Consoles with active cooling vents (think later disc-based systems with fans) shouldn't be wrapped tight in plastic film. Give them a breathable layer, a cotton pillowcase or microfiber sleeve, inside the sealed tote, and let the desiccant handle the humidity. The tote is your moisture barrier; the fabric is your scratch and dust barrier.
Maintaining this controlled environment prevents moisture damage to sensitive internal components, a principle that remains equally vital when storing vintage collections of paper-based games.Controllers and cables are where most collections quietly fall apart. Tangled cords stress the internal wiring, and old batteries leak and destroy controller contacts. Pull every battery out before storage, AAs, button cells, and rechargeable packs.
Then handle the cables:
Before you pack controllers away, test them. Our guide on how to test used console controllers shows you how to catch dead buttons and drift now, while you can still fix them.
Pack for the move, not the shelf, a console that shifts in its box can crack a corner or snap a connector.
Here's the packing order we use:
Bubble wrap works well for consoles. Just don't wrap it tight against cartridge slots, where it can press dust and debris inward.
What not to stack: never stack heavy bins on top of a bin holding a console.
Long-term storage for game consoles isn't set-and-forget. The collections that survive are the ones somebody actually opens up and checks; the ones that die are where a leaking battery sat against a board for three years because nobody looked.
Put it on your phone calendar. Two reminders a year is all it takes.
Open each bin and check, in this order:
Your consoles aren't the only things with batteries. Cartridge games carry save batteries too, and those die quietly, taking your save files with them.
So the inspection checklist has a second half:
If a cartridge battery is on its way out, our game cartridge battery replacement service handles the swap before your progress disappears.
If an inspection turns up heavy corrosion, a dead board, or a swollen battery, don't keep storing it and hope.
The best storage system is the one you'll actually use. If your consoles are buried under three bins, you'll never pull them out to play. That defeats the whole point.
Build around access:
For display, keep consoles out of direct sunlight and dust them regularly. For the rest, bins work great. Label everything clearly, and keep an inventory list on your phone.
Here's a quick summary of the whole process:
| Step | Task | How Often |
|---|---|---|
| Cleaning | Wipe shell, clear vents, clean contacts | Before storage |
| Location | Dry, dark, steady-temperature spot | Set once |
| Humidity | Silica packs in sealed totes | Check every few months |
| Controllers | Remove batteries, coil cables loosely | Before storage |
| Packing | Wrap separately, pad corners, don't stack heavy | Before storage |
| Inspection | Corrosion check, battery swap, test boot | 1-2 times a year |
| Organization | Shelves, labeled bins, inventory list | Ongoing |
And if you'd rather skip the guesswork entirely, we stock tested, cleaned consoles ready to play. Take a look at our ColecoVision System, our Custom Nintendo Entertainment System (NES), or our Pikachu Nintendo 64 System.


Yes, pull the batteries from controllers, handhelds, and any accessory that takes them. Old alkaline batteries can leak and corrode the contacts, and that damage is often permanent. For cartridge games with save batteries, the coin cell will eventually die whether you store the game or not, so note which saves matter to you and plan a battery replacement before they fail. Check stored controllers again every few months for leakage or corrosion.
Aim for a stable, moderate indoor room rather than a garage, attic, or shed. You want a dry environment where temperature does not swing hard between day and night. Avoid spots near radiators, windows, or exterior walls that collect condensation. A closet or interior shelf in a climate-controlled room works well. If you must use a basement, keep consoles off the floor and add a desiccant pack to the bin.
Open each bin and inspect every three to six months. Look for dust, moisture, corrosion on battery contacts, and any sign of pests. Power on each console for a few minutes if you can, since capacitors and switches do better with occasional use. Replace spent desiccant packs, and note any cartridge save batteries that are nearing the end of their life so you can swap them before your progress disappears.
The original box is worth keeping for collector value, but it is not a storage container. Cardboard absorbs moisture and offers little protection from drops or dust. Keep the box flattened or empty in a dry place, and store the console itself in a padded plastic bin or on a shelf with a cover. If you display the box, keep it out of sunlight so the print does not fade.
Storing your collection right takes a weekend of work and a yearly check-in. That's the whole trade: a little effort now versus a dead console later.
At Retro Gaming of Denver, we've built our shop around keeping these machines alive. Every refurbished console we sell is thoroughly tested and cleaned, comes with a 1-year warranty, and ships free on orders over $50. If you'd rather play than pack, start with our refurbished lineup and get back to the games you grew up with.


{"one"=>"Wählen Sie 2 oder 3 Artikel zum Vergleichen aus", "other"=>"{{ count }} von 3 Elementen ausgewählt"}
Wählen Sie das erste zu vergleichende Element aus
Wählen Sie das zweite zu vergleichende Element aus
Wählen Sie das dritte Element zum Vergleichen aus

Einen Kommentar hinterlassen