🔏 Safe and Secure Checkout | 🔄 Easy Returns within 30 days | 📜 Free 1 Year Warranty on all Refurbished Gaming Consoles | 👮🏿 💒 Service Member, Government Worker, EMS & Teacher Discount Up To 20%👩⚕️ 🏥 | 📦🏷️✈️ Free U.S Shipping on Orders over $50 - DAILY WORLDWIDE SHIPPING 📦🏷️✈️
When you buy a used NES console, you're getting a piece of gaming history. But you're also getting hardware that's nearly 40 years old.
Wizards and Warriors - NES
The reality is straightforward: virtually all original NES-001 units suffer from loose pin connectors due to springs losing tension over time. According to Retro Tech Lab's 2026 hardware analysis, this is the single most common issue affecting used NES consoles today. Beyond connector problems, you'll encounter blinking red lights, gray screens, scrambled graphics, freezing games, and controller failures.
The good news? Most of these issues are fixable. Understanding what's wrong with your console is the first step toward getting it working again.
The NES Blinking Red Light Fix and Startup Failures
The blinking red light is the NES's way of telling you something is seriously wrong. It's the most visible sign of trouble, and it stops you from playing anything.
Why the Red Light Blinks
Your console's power light blinks red when the system detects a problem during startup. This isn't a random error. The NES has a built-in safety mechanism that prevents the console from running if it senses a fault. Common causes include:
A dirty or corroded cartridge connector preventing proper contact
A failed power supply unable to deliver stable voltage
Internal component failure, often capacitors that have degraded with age
A cartridge that's not seated properly in the slot
The blinking red light tells you the console won't boot until you fix the underlying issue.
Diagnosing a Console That Won't Power On
Start with the simplest checks first. Insert a game cartridge firmly until you hear a click. The cartridge should sit flush against the console. If the light still blinks, remove the cartridge and try a different one.
Next, check your cables. Make sure the power cord is plugged in firmly and the wall outlet works. Test the outlet with another device to confirm it has power. A loose power connection often looks like a complete console failure.
If multiple cartridges fail and your power connection is solid, the issue likely sits inside the console. This requires a Phillips #00 or #0 screwdriver to access the internal connector.
Phillips #00 Screwdriver
Pro TipBefore opening your console, photograph the cable positions and screw locations. This makes reassembly much easier and prevents lost screws.
NES No Picture Troubleshooting: Gray Screens and Display Problems
A gray or blank screen means your console is powering on but not sending a video signal to your TV. This is different from the blinking red light, which prevents startup entirely.
When you get a gray screen, your NES is running but can't communicate with your television. Check these items in order:
Verify your TV is set to the correct input (usually "Video 1" or "AV" for older sets)
Inspect the video cable for loose connections at both the console and TV
Try a different TV if one is available to rule out a TV problem
Test a known-working game cartridge to confirm the issue isn't the game itself
If the screen remains gray after these steps, the problem is likely inside the console. The video output circuit may have failed, or the cartridge connector issue is preventing game data from loading properly.
Watch OutDo NOT attempt to repair internal video circuits unless you have experience with electronics. A mistake here can cause permanent damage to your console or create safety hazards.
Scrambled Graphics and Pixelation
Scrambled or corrupted graphics during gameplay suggest the console is running but the cartridge connection is unstable. You'll see glitchy sprites, broken tiles, or strange colors that shouldn't be there.
This almost always points to dirty cartridge contacts. The game loads partially, but signal loss causes the display to corrupt. The solution is cleaning, not replacement.
NES Cartridge Connector Cleaning and Contact Corrosion
The cartridge connector is where your game plugs into the console. Over decades, dust, oxidation, and corrosion build up on the metal contacts. This prevents proper electrical connection between the cartridge and the motherboard.
Why Dirty Contacts Cause Game Compatibility Issues
When contacts are dirty, electrical resistance increases. The console struggles to read the game data. You might see the red light blink, get a gray screen, experience freezing, or see scrambled graphics. Sometimes the game works for a few minutes, then fails.
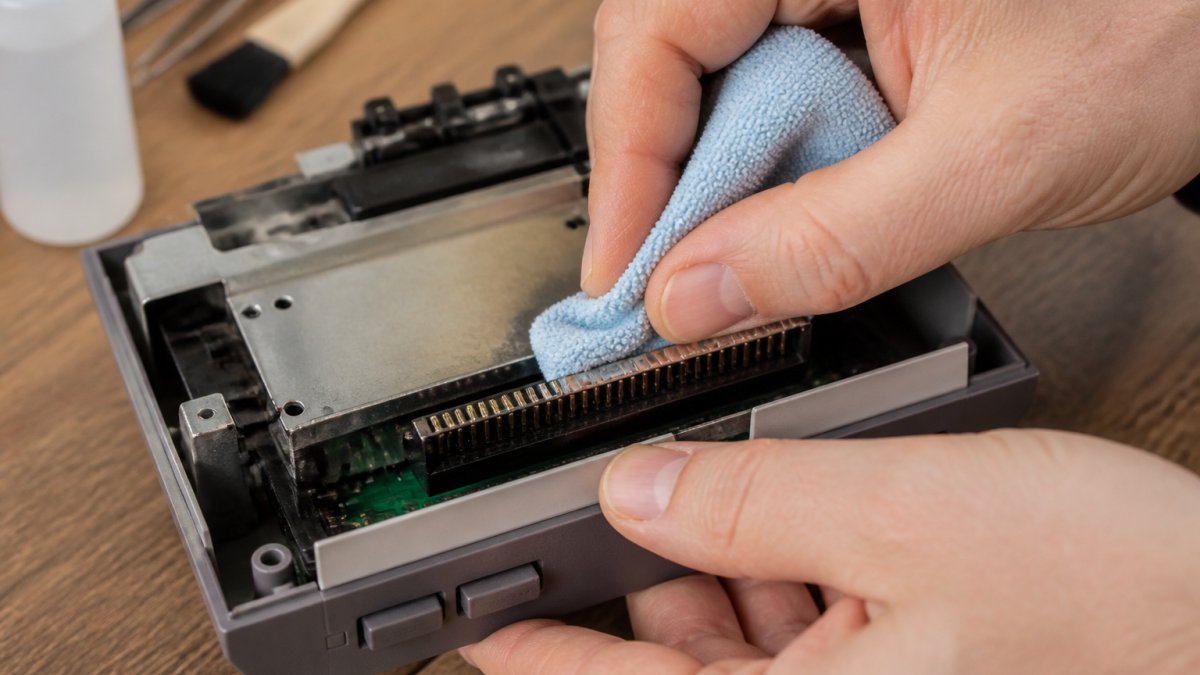
Close-up of hands carefully cleaning an NES cartridge connector with a soft microfiber cloth and isopropyl alcohol solution, showing proper technique without touching the pins
The connector pins inside your console are fragile. If they're bent or damaged, no amount of cleaning will help. Inspect them with a flashlight before cleaning. Look for bent, broken, or severely corroded pins.
Safe Cleaning Methods and What Not to Use
Use isopropyl alcohol (90% or higher) and a soft microfiber cloth (SOLVED: Isopropyl vs denatured alcohol - Electronics Skills). Dampen the cloth with alcohol and gently wipe the metal contacts on your cartridge. For the console's internal connector, use a cotton swab dampened with alcohol. Work slowly and let the alcohol evaporate completely before powering on.
What not to use:
Water or tap water (causes rust and corrosion)
Abrasive materials like steel wool (damages the gold plating)
Vinegar or other acids (corrodes the metal)
Excessive force (bends the pins)
Allow at least 30 minutes for alcohol to fully evaporate before inserting a cartridge. Moisture inside the console causes shorts and component failure.
Game Freezing, Dropouts, and Performance Problems
A game that freezes mid-play or randomly resets is frustrating. Usually, this points to an unstable cartridge connection.
Your console reads game data constantly during play. If the connection drops even briefly, the game crashes. You'll see the screen freeze, hear the audio loop, or get a complete reset back to the startup screen.
Freezing often happens after the console runs for a few minutes. This suggests a thermal issue. As components warm up, the connection becomes worse.
Try a different cartridge first. If the new game also freezes, your console has an internal connection issue. If only one game freezes, that cartridge may be damaged.
Problem
Most Likely Cause
Next Step
Blinking red light
Dirty connector or failed power supply
Clean cartridge connector
Gray screen
Video cable issue or video circuit failure
Check cables; test another TV
Scrambled graphics
Unstable cartridge connection
Clean cartridge and connector
Game freezing
Dirty connector or thermal issue
Clean; test in cool environment
Controller unresponsive
Worn controller or console port
Test different controller
Used NES Buying Checklist: What to Test Before You Buy
Before you hand over money for a used NES console, test it thoroughly.
Power on the console and watch for the blinking red light. If it blinks, ask the seller what they've tried.
Insert a cartridge and verify the game loads. Play for at least five minutes. Watch for freezing, glitches, or unexpected resets. Test multiple games if possible.
Check the controller ports. Plug in a controller and press buttons. Verify the D-pad, buttons, and Start/Select register properly.
Inspect the case for damage. Cracks, missing screws, or yellowed plastic don't affect function, but they lower the console's value. Look inside the cartridge slot with a flashlight.
Key TakeawayTest the console with multiple cartridges in different genres. A console that plays one game perfectly might fail on another due to pin alignment issues.
Distinguishing Console Faults From Cartridge and Cable Problems
Before you blame your console, rule out the cartridge and cables first. Cables fail more often than consoles do.
Swap in a different video cable if you have one. If the picture appears, your original cable was bad. Test your cartridge on another NES if possible. If the game works on a different console, your cartridge is fine and your console needs attention.
Try multiple cartridges on your console. If all of them fail, the console is the problem. If some work and others don't, the issue could be cartridge-specific damage or a connector that's partially corroded.
Repair Difficulty, Tools, and When to Replace Instead
Opening a used NES console requires basic tools and moderate skill. You'll need a Phillips #00 or #0 screwdriver to remove the case screws. The Phillips #00 Screwdriver from Retro Gaming of Denver is precision-made for small electronics and costs just $5.49.
Phillips #0 Screwdriver
Inside, you'll find the motherboard, power supply, and cartridge connector. Cleaning the connector is straightforward: dampen a cotton swab with isopropyl alcohol and gently wipe the pins. This takes 15 minutes and fixes most issues.
Replacing capacitors or the power supply requires soldering skills and specialized knowledge. If your console needs component-level repair, consider whether the cost is worth it. A refurbished console from a trusted seller can be a cost-effective alternative to professional repair.
Common Mistakes to Avoid During Repair
Never force a cartridge into the slot. Gentle pressure is all you need. Forcing it can bend pins permanently.
Don't use excessive heat when cleaning. A hair dryer on low setting is fine, but don't use a heat gun. Excessive heat damages solder joints and plastic parts.
Avoid touching the motherboard with bare hands. Static electricity can damage components. Wear an anti-static wrist strap if you have one, or touch a grounded metal part of the console case before working inside.
Don't reassemble the console while it's wet. Moisture causes shorts and corrosion. Let isopropyl alcohol dry completely, at least 30 minutes, before powering on.
Prevention and Long-Term Storage for Used NES Consoles
Once your console is working, keep it that way. Store it in a cool, dry place away from direct sunlight.
Use a dust cover when the console isn't in use.
Play your console regularly if you can. Regular use keeps components from drying out and helps you catch problems early.
Insert and remove cartridges gently. Rough handling bends the pins inside the slot.
According to iFixit's 2026 NES troubleshooting guide, proper storage conditions and regular maintenance prevent most issues from developing in the first place.
Consider a refurbished console from Retro Gaming of Denver if you want peace of mind.
Used NES consoles offer incredible value and authentic gaming experiences. But age brings challenges.
Frequently Asked Questions
Why does my used NES console blink a red light and fail to start games?
The blinking red light typically signals that the console's motherboard cannot detect a valid game cartridge. This happens because the metal connector pins inside the cartridge slot lose tension over decades of use and thermal cycling. Virtually all original NES-001 units experience this issue. The fix often involves either cleaning the cartridge contacts or using a cleaning cartridge to restore connection quality. In some cases, the console's internal pins may need realignment by a professional.
How do I safely clean NES cartridge connectors without damaging them?
Use a soft, lint-free cloth slightly dampened with isopropyl alcohol (90% or higher). Gently wipe the gold connector pins on the cartridge in one direction only, never scrub back and forth. Allow the cartridge to air-dry completely before inserting it into the console. Avoid abrasive materials, steel wool, or harsh chemicals that can corrode or remove the protective gold plating. If the contacts show significant corrosion, professional cleaning services may be safer than attempting it yourself.
What should I test when buying a used NES console to avoid problems later?
Power on the console and observe whether it starts cleanly without a blinking red light. Test at least two different game cartridges to rule out cartridge-specific problems. Check that the video output displays a clear picture without gray screens, scrambling, or pixelation. Listen for unusual noises from the fan or internal components. Eject and reinsert a cartridge several times to verify the cartridge slot mechanism works smoothly. Ask the seller about the console's storage history, consoles kept in humid or temperature-unstable environments are more likely to develop corrosion and component failure.
Is it worth repairing a used NES console, or should I buy a new one instead?
Most common NES issues like dirty contacts, blinking red lights, and minor display problems are inexpensive to fix and worth repairing. Cleaning cartridge connectors costs little beyond a soft cloth and isopropyl alcohol. However, internal component failures like capacitor degradation or motherboard damage may require professional repair costing $50-150 or more. If the console is rare or sentimental, repair makes sense. For casual family use, a refurbished console with a warranty, like those from Retro Gaming of Denver backed by a 1-year warranty, offers reliability without the repair gamble.




Leave a comment